


Instead of matching blank garments, artwork, and press instructions from separate messages, use a blank apparel to DTF transfer workflow that keeps them on one production traveler. Pair approved blanks with DTF2GO’s PRINT & CUT DTF Transfers, validate the application on a test garment, and release finished merch only after inspection.
- DTF2GO supplies ready-to-press DTF transfers for apparel decorators outsourcing transfer production.
- A blank apparel to DTF transfer workflow starts with approved blanks, artwork, and placement measurements.
- Choose cut-to-size transfers for individual handling or gang sheets for grouped designs.
- Use transfer-specific heat-press instructions; approve a test garment before releasing the batch.
Why this matters
A correct transfer on the wrong blank is still a rejected garment. Your production workflow must control garment identity, artwork revision, placement, and application—not just whether the press closes.
DTF2GO is best for apparel decorators who want ready-to-press DTF transfers without producing the transfers themselves. Outsourcing transfer production removes that manufacturing stage from your shop; it does not remove your responsibility for blank selection, heat-press setup, or finished-garment checks.
For your 2026 production jobs, keep the approved garment specification and transfer application instructions together. Treat the production traveler as the instruction sheet that stays with the work, whether you use a spreadsheet, a printed form, or your existing order system.
Before you start
- Collect the approved job materials. Have the blank garment style, fiber content, color, size breakdown, finished artwork, decoration dimensions, placement reference, and customer approval. Confirm access to the ordering account you will use for transfers.
- Prepare the application station. Have a heat press appropriate for the garment and placement, measuring tools, the transfer supplier’s application instructions, and the press manufacturer’s operating guidance. Reserve a test blank that matches the production fabric and color.
- Check the hidden compatibility problem. Seams, pockets, zippers, and thick hems can keep the print area from receiving even pressure. Confirm that you can load the intended decoration area flat before ordering transfers or starting the batch.
Do not copy a temperature, dwell time, or peel method from an unrelated transfer. Obtain the instructions for the transfers you actually receive. A garment’s fiber label alone does not establish that its coatings, dyes, or construction tolerate the intended application.
Job specification and blank approval
Your first configuration unit is the production traveler. These are records you create for the job, not assumed fields in a supplier’s ordering interface.
- Identify the job. Record the order reference, customer, approved artwork revision, and responsible operator. Include 2026 in your filing convention when it distinguishes current work from archived jobs.
- Define the blank. Record the manufacturer’s style identifier, color, fiber composition, and size quantities. Inspect the received garments against that record rather than relying on the carton label alone.
- Measure the decoration. Specify the finished artwork width and height in inches. Record placement from a repeatable garment reference, such as the centerline and an identified seam—not from a photograph’s apparent proportions.
- Approve the combination. Confirm the design, garment color, print dimensions, and placement together. Save the approval with the traveler and stop replacing files once production preparation begins.
Expected result: Another operator can identify the correct blank, artwork, and placement without asking you to reconstruct the order.
Blank checks that belong on the traveler
Inspect the decoration area for holes, stains, construction defects, and obstructions. Separate questionable blanks before you apply a transfer; decoration does not turn a defective garment into an acceptable finished item.
Use the actual production garment for placement planning. A print positioned correctly on a flat T-shirt mockup does not establish workable placement on a hoodie with a pocket or a garment with a chest seam.
Keep garment selection and application approval separate. The customer approves the intended appearance; your production test establishes whether the chosen blank and transfer work together under the documented process.
Artwork and transfer preparation
Choose the transfer format around how your shop will handle the job. DTF2GO supplies custom cut-to-size, ready-to-press DTF transfers; your workflow still needs artwork checks and a reliable way to match every transfer to its garment.
Cut-to-size transfers or gang sheets?
| Transfer option | Best for | Production advantage | Trade-off |
|---|---|---|---|
| PRINT & CUT DTF Transfers | Jobs where operators need individual transfers | Removes your shop’s sheet-separation task | Each loose transfer still needs identification and quantity control |
| 31" DTF Gang Sheet UPLOADER | Shops preparing a completed gang-sheet layout | Groups multiple designs in one prepared layout | Adds layout checking, separation, and sorting work |
The supplied catalog also names a 32-inch DTF Gang Sheet BUILDER. That is a different named option from the 31-inch UPLOADER; do not treat those dimensions as interchangeable layout instructions. Check the selected product’s current artwork requirements before preparing the file.
Choose cut-to-size transfers when eliminating sheet separation matters most. Choose a gang sheet when your shop can control layout and sorting. Neither format replaces blank testing or finished-garment inspection.
- Check artwork at finished size. Inspect spelling, fine details, transparent areas, and any unwanted background. Enlarge the on-screen view to find defects, then return to the intended physical dimensions to judge readability.
- Confirm the submission requirements. Follow the selected transfer product’s file, dimension, and orientation instructions. Do not assume that every upload requires mirrored artwork or that every transparent-looking preview exports transparently.
- Match artwork to garments. Record which file and print size belong to each garment group. For personalized work, keep the recipient identifier with the design throughout preparation.
- Reconcile the order. Compare transfer quantities with garment quantities and decoration locations. A front-and-back garment requires both designs to be accounted for; counting garments alone misses that distinction.
Expected result: Every required decoration has an approved file, defined dimensions, and an identified destination before you submit the transfer order.
The following catalog options correspond to the two handling routes above. Select the format after you have confirmed your artwork and sorting plan.


Heat-press setup and first-garment approval
The press station turns an approved design into a finished garment. Keep incoming blanks, staged transfers, and inspected garments in separate areas so unfinished work cannot enter the packing queue.
- Verify the equipment. Follow the press manufacturer’s checks for condition, temperature verification, and pressure adjustment. Use the controls and measurement method specified for your machine; a display reading alone does not prove uniform platen temperature.
- Record the application recipe. Copy the received transfer’s temperature, dwell time, pressure guidance, peel condition, and any finishing-press instructions onto the traveler. Keep units with every value.
- Load the test garment. Flatten the decoration area and keep obstructing seams or hardware away from the contact zone. Measure placement against the approved reference before closing the press.
- Apply and peel as instructed. Follow the transfer-specific sequence. If the instructions call for a finishing press or a protective sheet, use the stated procedure rather than substituting an improvised step.
- Inspect before batch release. Check placement, color appearance, fine detail, edge adhesion, and garment damage. Retain 1 test garment as the physical reference for that approved setup.
Expected result: You have an accepted decorated garment and a recorded process that the next operator can follow.
What the first garment must prove
An acceptable first garment confirms more than adhesion. Compare the print with the approved artwork, check its position on the actual garment, and look for scorching, discoloration, visible adhesive outside the design, or lifted details.
For a new blank-and-transfer combination in 2026, include a wash evaluation before treating the process as established. Follow the applicable garment and transfer care instructions, and record what you evaluated; do not promise a wash-cycle lifespan from a single application test.
If the test fails, hold the batch. Change one relevant variable at a time and document the next result instead of repeatedly adding heat without identifying the failure.
Batch pressing and finished-merch release
Once the test garment passes, turn the accepted setup into a controlled production sequence. Keep the reference garment visible at the station, but keep it separate from the customer’s counted order.
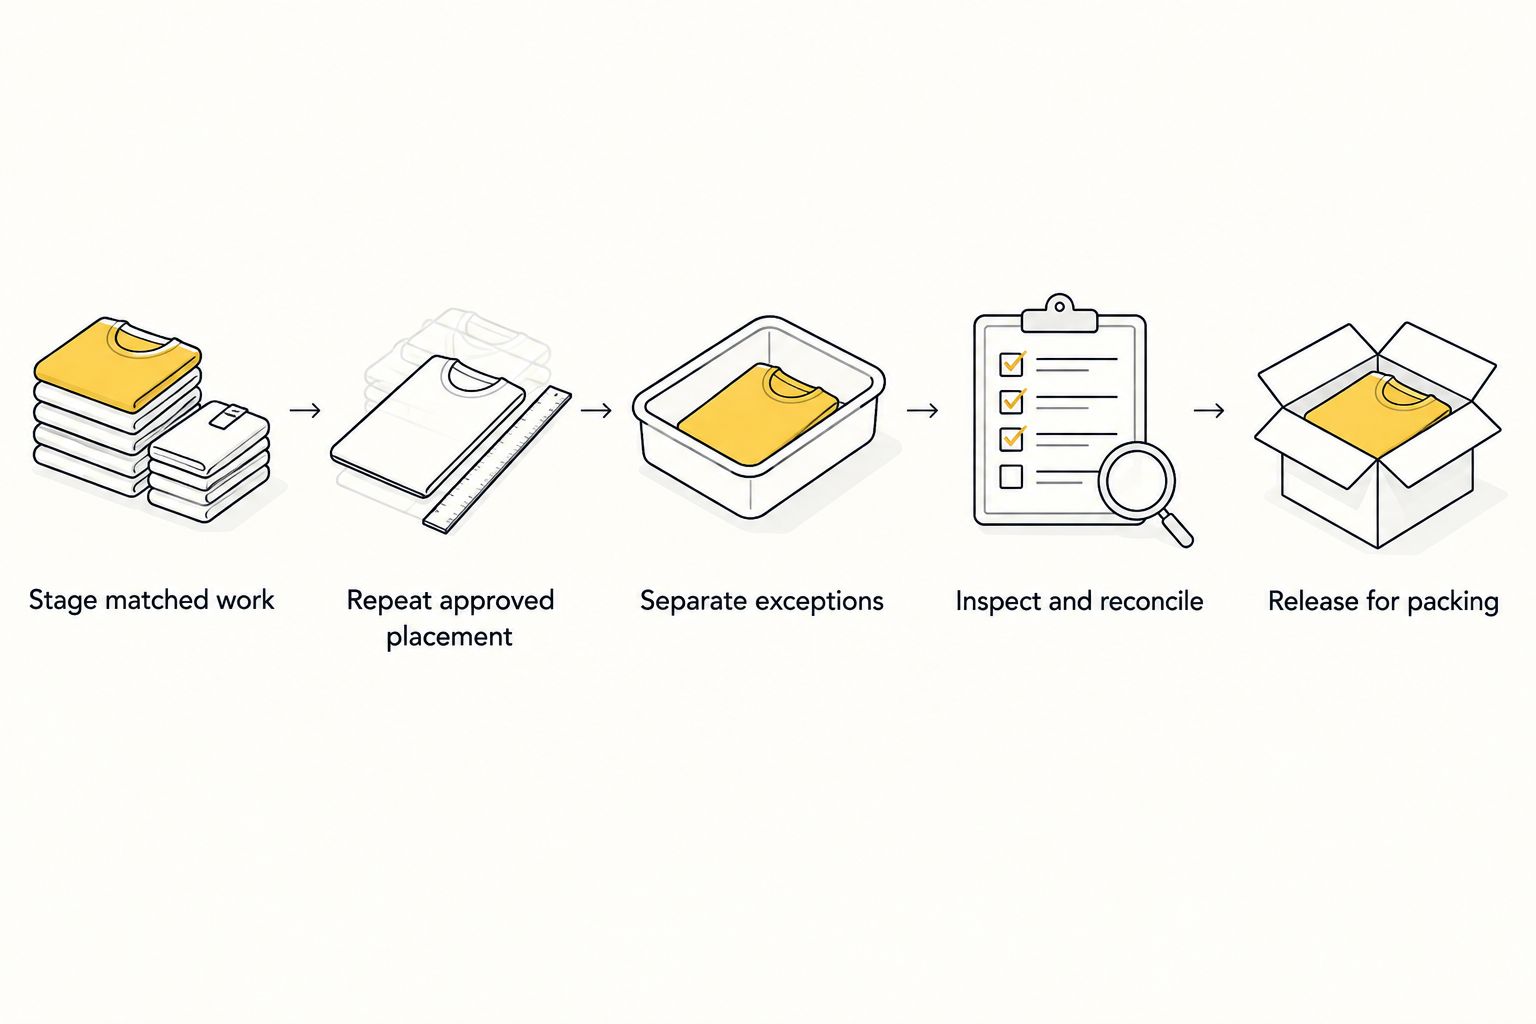
- Stage matched work. Pair each garment group with its assigned transfers and traveler. Separate similar-looking designs and personalized items before pressing begins.
- Repeat the approved placement. Use the same measuring reference and loading method as the test. Recheck the setup when you change garment construction, print location, or artwork size.
- Separate exceptions immediately. Move garments with suspected damage, placement errors, or adhesion defects out of the accepted stack. Record the defect against the job instead of leaving the next operator to discover it.
- Inspect and reconcile. Compare accepted garments against the approved size breakdown and decoration requirements. Check that every required location is decorated and every personalized item matches its recipient.
- Release for packing. Let garments cool before stacking and packing. Include applicable care instructions and retain the traveler, artwork approval, and quality-control record with the completed job.
Expected result: The packing queue contains only inspected garments, and your accepted count agrees with the order.
Use this same release sequence throughout 2026 so operators do not have to interpret a different finish standard for every customer. Consistency comes from documented acceptance criteria, not from assuming an experienced operator will remember every job detail.
Repeat the workflow when an order changes
Reorders are the adjacent workflow: keep approved job knowledge, but verify what has changed. A familiar design does not establish that a replacement blank or a new transfer lot behaves identically.
- Same artwork, different blank: Verify fabric, color, construction, placement, and application with the new garment.
- Same blank, revised artwork: Issue a new artwork revision and reconcile dimensions and decoration quantities. Remove the superseded file from active production materials.
- Same combination, new production run: Confirm the received transfer instructions and compare the first decorated garment with the retained reference.
For personalized replenishment, release only the affected names or designs. Keep the original approved layout available for comparison, but do not copy an old roster into a new order without checking every entry.
Treat your 2026 reorder record as a controlled revision, not a fresh pile of messages. Record what changed, what stayed approved, and which checks you repeated.
Troubleshooting
Transfer edges lift during peeling
Stop and compare the peel condition with the supplied instructions. Check application time, verified temperature, and even contact pressure; isolate the garment rather than pressing the remaining batch with an unconfirmed setup.
The garment shows a platen mark or discoloration
Hold production and review the blank’s heat tolerance and the documented application procedure. Test a compatible process on another blank; do not lower temperature blindly and accept weaker adhesion as the trade-off.
A design sits crooked or crosses a seam
Recheck garment loading and the placement reference. Make sure the garment—not merely the carrier film—is aligned; use the approved measurement points before the next application.
Personalized transfers reach the wrong garments
Stop sorting by appearance alone. Pair each recipient identifier, garment size, and transfer in a labeled job packet, then inspect the finished personalization against the order before packing.
The transfer changes color on a dyed garment
Investigate dye migration and confirm blank-and-transfer compatibility before continuing. Evaluate the test garment after cooling as well as immediately after pressing; do not accept the batch solely because the print looked correct when the press opened.
Customize your workflow
Start with a traveler that operators can complete, then add controls for your actual failure points. Record exceptions by garment style, transfer format, placement, and press setup so you can distinguish an artwork problem from an application problem.
DTF2GO’s ready-to-press DTF transfers fit the transfer-supply stage of this process. Your shop owns garment qualification, pressing, inspection, and packing; keep those responsibilities explicit when several people handle the order.
For multi-location designs, add a separate sign-off for each decorated area. For recurring programs, retain the approved garment reference and revision history instead of relying on a customer’s old mockup.
FAQ
What is the blank apparel to DTF transfer workflow?
The workflow is blank approval, artwork preparation, transfer ordering, test application, batch pressing, and finished-garment inspection. Keep garment identity, print dimensions, placement, and application instructions on one production traveler.
Are cut-to-size transfers better than gang sheets for apparel production?
Cut-to-size transfers are better when your priority is removing sheet-separation work. Gang sheets suit shops that can prepare layouts and control separation and sorting; neither format eliminates application testing.
What heat-press settings should I use for DTF transfers?
Use the settings supplied for the exact transfers you receive. Record temperature, dwell time, pressure guidance, peel condition, and any finishing step, then validate the process on the intended blank.
Do I need to mirror artwork before ordering DTF transfers?
Follow the selected product’s submission instructions rather than assuming that artwork must be mirrored. Confirm orientation, file requirements, and finished dimensions before submitting the order.
Can I use the same DTF workflow for every blank garment?
Use the same production-control workflow, but qualify each new garment-and-transfer combination. Fabric, dyes, coatings, seams, and construction affect whether the intended application is suitable.
Should I test a garment before pressing the whole order?
Yes, approve a test garment before releasing the batch. Check appearance, placement, adhesion, and garment damage, and include a wash evaluation when establishing a new combination.
Does ordering ready-to-press transfers replace quality control?
No, ready-to-press transfers replace your shop’s transfer-production stage, not finished-apparel quality control. You still need to verify blanks, apply the transfers correctly, inspect the garments, and reconcile the completed order.
One last thing
Keep the approved physical garment, not just its photograph. A photograph records appearance but cannot preserve the print’s hand feel or provide the same edge-adhesion reference. Label the retained garment with the artwork revision, blank identity, and application record so your next operator has something concrete to compare.


